smartctl -a -d sat+megaraid,0 /dev/sda -s on
服务器上的SSD有时候性能不及预期, 如果写入数据挺多的,可以尝试通过以上命令查看下

smartctl -a -d sat+megaraid,0 /dev/sda -s on
服务器上的SSD有时候性能不及预期, 如果写入数据挺多的,可以尝试通过以上命令查看下
有个分析日志的小东西, 由于日志中有空格, 也有双引号隔开的内容,简单搜索下了,发现推荐用shlex.split来做分割,测试下,结果挺满意的,实际跑起来性能非常差
通过 kernprof -l -v 分析发现99%的时间都用在shlex.split上了, 所以偷懒是不行的了
这里建议用re正则表达式来做,比如腾讯云的日志
访问日志字段包括:请求时间、客户端IP、访问域名、文件路径、字节数、省份编码、运营商编码、HTTP状态码、referer、Request-Time、”UA”、”range”、HTTP Method、协议标识、缓存HIT/MISS、
p=re.compile(r'(\S*) (\S*) (\S*) (\S*) (\S*) (\S*) (\S*) (\S*) (\S*) (\S*) “([^”]*)” “([^”]*)” (\S*) (\S*) (\S*)$’)p=re.compile(r'(\d*) (\S*) (\S*) (\S*) (\d*) (\S*) (\S*) (\d*) (.*) (\S*) “([^”]*)” “([^”]*)” (\S*) (\S*) (\S*)$’)
由于refer 中有可能有1个或者多个空格, 所以用(.*) 替代了(\S*), 20200527
finddata = p.findall(dataline)
这么操作的结果是42W行数据, 从8分钟下降到10秒作用
新版的curl 支持了更细致时间粒度的curl_easy_getinfo,以及HTTP2, 这里介绍手工编译源码安装方式,并使用openssl1.1.1b
./config --prefix=/opt/itc/openssl enable-weak-ssl-ciphers no-shared && make && make installOPENSSL_LIBS="/opt/itc/openssl/lib/" ./configure --prefix=/opt/itc/curl/nghttp2 –enable-static=yes –enable-shared=no && make && make install./configure LDFLAGS="-static" --prefix=/opt/itc/curl --with-ssl=/opt/itc/openssl --with-nghttp2=/opt/itc/curl/nghttp2 --disable-ldaps --without-libidn2 --enable-static=yes --enable-shared=no make make install
这样子得到的是不依赖openssl和nghttp2动态链接库的curl,可以拷走给别的机器
./configure  LDFLAGS="-static" --prefix=/opt/itc/curl --with-ssl=/opt/itc/openssl  --with-nghttp2=/opt/itc/curl/nghttp2 --disable-ldaps --without-libidn2 --enable-static=yes --enable-shared=no
make LDFLAGS="-all-static -static -L/opt/itc/openssl/lib -L/opt/itc/curl/nghttp2/lib -ldl"
make install
这样子得到的是: 不依赖任何动态链接库的版本
可能遇到的问题:
1./usr/bin/ld: cannot find -lnghttp2 或者 -lssl 之类的
这是curl找不到对应的依赖库,请确认给了正确的configure参数,如果还不行,可以在configure的时候加上LIBS=-L/opt/itc/openssl/lib/ -L… 多个依赖库以空格分开
2. configure: error: one or more libs available at link-time are not available run-time. Libs used at link-time: -lnghttp2 -lssl -lz -lrt -lcrypto -ldl
这是curl找到了link-time 库,却没找到动态依赖库, 需要在configure的时候加入LDFLAGS=”-static”,让curl的编译程序知道我们要做静态的东西
3. 静态编译make的时候为什么要带那么长的参数,通常不是LDFLAGS=”-all-static”就可以了么?
是的,通常是可以的,打开src/Makefile能看到make LDFLAGS 带的参数会冲掉configure的时候找到的依赖库环境
LD = /usr/bin/ld -m elf_x86_64
 LDFLAGS = -static -L/opt/itc/openssl/lib -L/opt/itc/curl/nghttp2/lib
 LIBCURL_LIBS = -lnghttp2 -lssl -lrt -lcrypto -ldl
所以要么完整一点写上去,要么就使用curl提供的curl_LDFLAGS参数也OK
make curl_LDFLAGS="-all-static"
4. 那么要用这些新的库编译example里边的例子怎么办?
 #gcc  chkspeed.c /opt/itc/curl/lib/libcurl.a /opt/itc/curl/nghttp2/lib/libnghttp2.a /opt/itc/openssl/lib/libssl.a /opt/itc/openssl/lib/libcrypto.a  -I/opt/itc/curl/include -I/opt/itc/curl/nghttp2/include   -lrt  -ldl  -o chkspeed
 #ldd chkspeed
        linux-vdso.so.1 =>  (0x00007ffc475a2000)
        librt.so.1 => /lib64/librt.so.1 (0x00007fcb5d748000)
        libdl.so.2 => /lib64/libdl.so.2 (0x00007fcb5d544000)
        libc.so.6 => /lib64/libc.so.6 (0x00007fcb5d1af000)
        libpthread.so.0 => /lib64/libpthread.so.0 (0x00007fcb5cf92000)
        /lib64/ld-linux-x86-64.so.2 (0x00005593e1eb2000)
这样子编译出来是把这几个库都包含在里边的
gcc chkspeed.c -L/opt/itc/openssl/lib/   -L/opt/itc/curl/nghttp2/lib -L/opt/itc/curl/lib  -I/opt/itc/curl/include -I/opt/itc/curl/nghttp2/include -lcurl -lssl -lrt -lcrypto -ldl -lnghttp2
这样子编译出来是带动态链接库的,但是需要设置环境变量,告诉系统那些.so在哪里,或者修改/etc/ld.so.conf.d/, 增加路径

当然,我们的openssl选择的是静态编译,所以出来的程序依赖只有nghttp2.so
部分知识点:
o: 编译的目标文件
a: 静态库,其实就是把若干o文件打了个包
so: 动态链接库(共享库)
lo: 使用libtool编译出的目标文件,其实就是在o文件中添加了一些信息
la: 使用libtool编译出的库文件,其实是个文本文件,记录同名动态库和静态库的相关信息
./configure LDFLAGS="-static"
make LDFLAGS="-all-static"
-I include,头文件和库文件,通常都是源码
-L 依赖链接库的目录,可能是静态的也可能是动态的
-l 依赖库的名称,比如-lssl -ldl -lz
pkgconfig 里边有对应的.pc文件,当-l 或者-L指定依赖的时候会自动去找
-l 是有顺序的,而且是从右到左开始包含的,比如
 -lcurl -lssl -lrt -lcrypto -ldl -lnghttp2
这里-lcurl 必须在最前边, -lssl 也必须在-lcrypto的前边,原因很简单: curl调用了所有的其他依赖库, 而ssl调用了crypto
参考文档:
https://github.com/curl/curl/issues/503
https://curl.haxx.se/mail/lib-2017-11/0107.html
https://stackoverflow.com/questions/48726825/setting-up-libcurl-on-linux
curl -s -w ‘Testing Website Response Time for :%{url_effective}\n\nLookup Time:\t\t%{time_namelookup}\nConnect Time:\t\t%{time_connect}\nSSL Time:\t\t%{time_appconnect}\nPre-transfer Time:\t%{time_pretransfer}\nStart-transfer Time:\t%{time_starttransfer}\n\nTotal Time:\t\t%{time_total}\n\nDownload Size:\t\t%{size_download}\nRequest Size:\t\t%{size_request}\nDownload Speed:\t\t%{speed_download}\n\n’ -o /dev/null https://www.sohu.com
curl支持以报告的形式给出多个连接时间参数,以上则是例子

| Syntax: | resolver address ... [valid=time] [ipv6=on|off]; |
|---|---|
| Default: | — |
| Context: | http, server, location |
http://nginx.org/en/docs/http/ngx_http_core_module.html#resolver
我们都知道nginx 有个resolver 能提供NS解析的功能,那么什么时候用系统自带配置,什么时候用resolver呢? 这里直接给结论:
proxy_pass 给一个域名, 用系统自带的resolv.conf
server {
listen 80 ;
server_name www.4os.org;
resolver 114.114.114.114 ipv6=off;
location / {
proxy_pass http://www.qq.com;
}
}
upstream server 里边跟域名, 用系统自带的resolv.conf
upstream backends {
server www.qq.com;
}
server {
listen 80 ;
server_name www.sohu.com;
resolver 114.114.114.114 ipv6=off;
location / {
proxy_pass http:// backends;
}
}
proxy_pass 后边跟的是变量,比如你设置的$host, 用resolver
server {
listen 80 ;
server_name www.4os.org;
resolver 114.114.114.114 ipv6=off;
location / {
set $ups “www.qq.com”;
proxy_pass http://$ups;
}
}
另外 nginx plus版本, upstream server 的域名如果带了resolver 参数,那么用resolver
resolver 10.0.0.2 valid=10s;

upstream backends {
    zone backends 64k;
    server backends.example.com:8080 resolve;
}

server {
    location / {
        proxy_pass http://backends;
    }
}
至于AAAA的IPV6结果,如果是用系统自带的解析器,那么nginx 会ipv4和ipv6一起解析, 如果你的nginx服务器没有V6地址,这会产生额外的一个upstream error,并next_upstream给V4地址
所以,如果要禁用V6解析, 你需要使用变量设置你的proxy_pass 回源,并明确定义resolver 的ipv6=off参数
以上结论基于nginx官方文档,并使用tcpdump监测dns解析获得
参考文档: https://www.nginx.com/blog/dns-service-discovery-nginx-plus/#domain-name-proxy_pass
最近维护一个古老代码的时候,在AS7里边编译的时候出现了不少错误,比如:
warning: comparison between pointer and integer, 这是代码 strptime(current_time, “%a%n%b%n%d%n%H:%M:%S%n%Y”, &tm) == NULL) 产生的
还有, warning: incompatible implicit declaration of built-in function ‘snprintf’, 这是类似 snprintf(path, sizeof(path), “%s/arc_%s”, archdir, com->cat) 的代码产生的
查了下,strptime的异常返回值确实是NULL, http://man7.org/linux/man-pages/man3/strptime.3.html
If strptime() fails to match all of the format string and therefore an error occurred, the function returns NULL.
一般来说, 类似的snprintf错误 添加 #include<stdlib.h>就好,但是这个古老代码里边已经有这个了
在代码的开头发现了这个东西
       _XOPEN_SOURCE
              Defining this macro causes header files to expose definitions as
              follows:

              o  Defining  with  any  value  exposes definitions conforming to POSIX.1, POSIX.2, and XPG4.

              o  The value 500 or greater additionally exposes definitions for SUSv2 (UNIX 98).

              o  (Since  glibc  2.2)  The  value  600  or greater additionally exposes  definitions  for   SUSv3   (UNIX   03;   i.e.,   the POSIX.1-2001  base  specification plus the XSI extension) and C99 definitions.

              o  (Since glibc 2.10) The  value  700  or  greater  additionally exposes  definitions  for  SUSv4 (i.e., the POSIX.1-2008 base specification plus the XSI extension).
https://linux.cn/man7/feature_test_macros.7.html, 初略的说,大概是不同的值会影响某些函数和库的一些标准行为,而默认的_xopen_soure 不带参数会被认为是<500
#define _XOPEN_SOURCE /* or any value < 500 */
所以需要修正这个模式,添加一个标准即可,由于代码比较古老,修改为500和600都可以编译通过
目前收费的证书有几个品牌: 来自于digicert旗下的 Geotrust 和 Digicert, 来自日本的globalsign
digicert: 其实是之前的verisign的替换,由于chrome拒绝掉了symantec的安全认证导致这个品牌的彻底消亡被digicert收购并重新签发证书
优点: 兼容性好,大品牌, RSA ECC双认证, 支持Windows XP SP3 +, iOS5 +, Firefox 2+, Android 1.5+
缺点: 贵, 如果要实现WinXP全兼容,需要Baltimore cross 认证
使用公司: weixin.qq.com www.sohu.com www.zhihu.com等
GeoTurs: 低端品牌, 由于被digicert收购后用新根签发,兼容性大增
优点: 便宜 兼容性好
缺点: 只支持RSA认证, 品牌认知度偏低
Globalsign: 来自日本的证书品牌, 2016年曾出现过中间证书异常吊销的事故,目前占据了越来越多的市场,目前百度 阿里 腾讯 京东 爱奇艺 搜狗都使用这个品牌
优点: 相对便宜,只有之前verisign的一半价格, 兼容性好
缺点: 2016年的事故让人有疑虑,签发过程会比digicert略微繁琐些
globalsign其实是个非常合适的性价比之选
当然,对于非常计较成本的用户,当然是用免费证书
https://knowledge.digicert.com/generalinformation/digicert-root-compatibility.htmlTLS1.3支持了更优秀的SSL 新特性,可以有效降低https的协商时间,建议升级
本文使用了最新的nginx 1.14.1 (该版本修正了 1.14 H2 cpu/mem 攻击漏洞: low)
#wget https://www.openssl.org/source/openssl-1.1.1.tar.gz
#wget http://nginx.org/download/nginx-1.14.1.tar.gz

#spdy兼容补丁
#wget https://raw.githubusercontent.com/favortel/nginx_patch/master/nginx-1.14.0_spdy_h2.patch

#OKHTTP H2 头部动态压缩兼容补丁
#wget https://raw.githubusercontent.com/favortel/nginx_patch/master/fssnginx_1.14.0_dynamic_table_size.patch

#PCRE ZLIB等
#wget https://ftp.pcre.org/pub/pcre/pcre-8.42.tar.gz
#wget https://zlib.net/zlib-1.2.11.tar.gz

#tar -zxvf openssl-1.1.1.tar.gz
#tar -zxvf pcre-8.42.tar.gz
#tar -zxvf zlib-1.2.11.tar.gz
#tar -zxvf nginx-1.14.1.tar.gz

#cd nginx-1.14.1
#patch -p1 < ../fssnginx_1.14.0_dynamic_table_size.patch
#patch -p1 < ../nginx-1.14.0_spdy_h2.patch

./configure --prefix=/opt/itc/nginx --with-http_stub_status_module --with-http_realip_module --with-http_ssl_module --with-openssl=../openssl-1.1.1 --with-pcre=../pcre-8.42 --with-pcre-jit --with-zlib=../zlib-1.2.11 --with-http_v2_module --with-http_spdy_module
#make && make install
配置比较简单,就是ssl_protocols 增加TLSv1.3就好, ssl_ciphers 不用特意改动:
...
ssl_protocols               TLSv1 TLSv1.1 TLSv1.2 TLSv1.3;
ssl_ciphers                 ECDHE-RSA-AES128-GCM-SHA256:ECDHE-ECDSA-AES128-GCM-SHA256;
ssl_prefer_server_ciphers   on;
ssl_ecdh_curve              secp384r1;
...
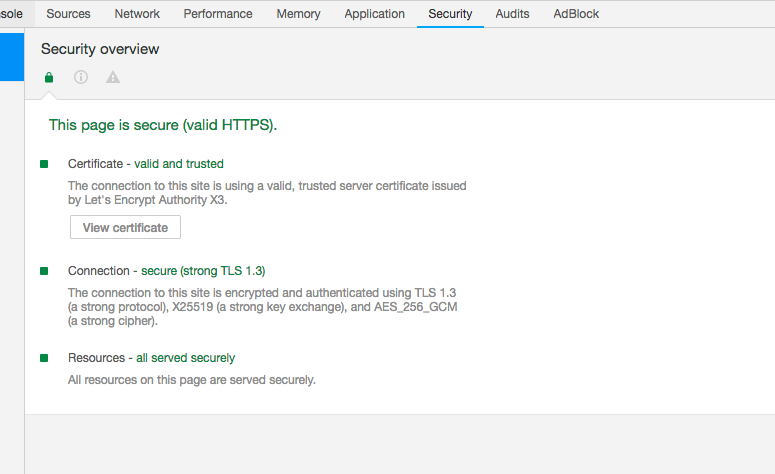
比如本站,如果您是用chrome访问的是https协议,打开开发者工具-security,就能看到本站使用了TLS1.3了
需要特别留意下,apache的配置是有顺序关系的,以下为先后:
<Directory> (except regular expressions) and .htaccess done simultaneously (with .htaccess, if allowed, overriding <Directory>)<DirectoryMatch> (and <Directory ~>)<Files> and <FilesMatch> done simultaneously<Location> and <LocationMatch> done simultaneously举个例子,执行顺序是 A > B > C > D > E
<Location />
E
</Location>
<Files f.html>
D
</Files>
<VirtualHost *>
<Directory /a/b>
B
</Directory>
</VirtualHost>
<DirectoryMatch “^.*b/”>
C
</DirectoryMatch>
<Directory /a/b>
A
</Directory>
一个危险的示例,在这个例子里边,其实deny 不生效,因为被后生效的 location 配置覆盖了
<Location />
Order deny,allow
Allow from all
</Location>
# Woops! This <Directory> section will have no effect
<Directory />
Order allow,deny
Allow from all
Deny from badguy.example.com
</Directory>
参考文档: http://www.who.int/manual/sections.html#mergin
nginx 1.6 cache objects depend on proxy_cache_key,such as
nginx 1.6的缓存对象取决于proxy_cache_key的设置,比如
proxy_cache_key $uri$is_args$args;
nginx 1.7 cache objects depend on proxy_cache_key and VARY Header
nginx 1.7的缓存对象取决于proxy_cache_key 和 服务器返回的VARY头的内容
Changes with nginx 1.7.7 28 Oct 2014
    *) Change: now nginx takes into account the "Vary" header line in a

backend response while caching.
If the upstream server reponsed this header: “Vary: Accept-Encoding”, cache object of the same url may save many copys depend on the different request headers: “Accept-Encoding”, in nginx 1.7 or above versions.
假如,你的upstream服务器返回了这样的header: “Vary: Accept-Encoding”,
相同一个url的缓存对象会基于请求header里边的”Accept-Encoding”的不同值 保存为许多份不同的副本,这个特性起于nginx1.7 版本
In this case, purge cache may failed, cause you don’t how many cache objects with “Accept-Encoding” headers
在这种情况下,清理缓存通常会失败,因为你不知道有多少的缓存对象有着哪些对应的”Accept-Encoding” headers
You have 2 choices to fix this problem:
你有两种选择来对付这个问题:
1. Rewrite the reuqest header “Accept-Encoding” in the front proxy serve
在最前端的代理服务器 重写请求的header: “Accept-Encoding”
      set $compress "none";

if ($http_accept_encoding ~* "gzip|deflate|compress") {set $compress "gzip,deflate";}

proxy_set_header Accept-Encoding $compress;
2. Ignore the response header “Vary” in the middle cache server
或者在中间层的cache服务器 忽略掉服务器返回的header “Vary”
proxy_ignore_headers Vary;
在这里, “Vary: Accept-Encoding”, 只是一个非常常见的举例,实际上你的后端源站可能会返回特异的Vary Header.