分类目录归档:nginx

nginx upstream [warn] load balancing method redefined 处理办法

<pre class="wp-block-code"><code>业务同事反馈新增consistent hash url的时候有报错, "load balancing method redefined"

看了下配置, 大致是这样子
<p>upstream 2165 {
keepalive 4096;
check interval=10000 rise=2 fall=3 timeout=3000 type=http default_down=false;
check_http_send 'GET /check_alive HTTP/1.0\r\nHost: check.sohuitc.cn\r\n\r\n';
check_http_expect_alive http_2xx;
server 1.1.1.1 max_fails=0;
server 1.1.1.2 max_fails=0;
hash $request_uri consistent;
}</p>
简单搜索了下, 有这么个答案:
https:&#47;&#47;ma.ttias.be/nginx-nginx-warn-load-balancing-method-redefined/
答案是: "You can mix keepalive and least_conn, but you should define least_conn before keepalive.", 就是把LB的method 放到Keepalive 指令的后边, 考虑到least_conn 和 hash其实都是LB的method

那么, 这是为什么呢?
参考nginx官方的文档, https://nginx.org/en/docs/http/ngx_http_upstream_module.html#keepalive
<p><code>When using load balancing methods other than the default round-robin method, it is necessary to activate them before the keepalive directive.</code></p>
官方文档要求把keepalive指令放到其他非RR的LB method的后边

我还想知道为什么呢?
翻开nginx的代码, 可以看到我这个hash 函数有个判断
http/modules/ngx_http_upstream_hash_module.c
<p>
    if (uscf-&gt;peer.init_upstream) {
        ngx_conf_log_error(NGX_LOG_WARN, cf, 0,
                           "load balancing method redefined");
    }</code>而Keepalive指令, 会尝试去初始化这个 <span style="background-color: initial; font-family: inherit; font-size: 0.857143rem;">uscf-&gt;peer.init_upstream</p>
http/modules/ngx_http_upstream_keepalive_module.c
<p>
  kcf-&gt;original_init_upstream = uscf-&gt;peer.init_upstream
                                  ? uscf-&gt;peer.init_upstream
                                  : ngx_http_upstream_init_round_robin;

    uscf-&gt;peer.init_upstream = ngx_http_upstream_init_keepalive;</p>
所以如果Keepalive指令在前边, 准备加载LB method的时候, 会发现这个变量已经被初始化了, 会认为是有其他LB method被加载? 就会有个<span style="background-color: initial; font-family: inherit; font-size: 0.857143rem;">load balancing method redefined</span> 告警了

另外, 这个问题其实是由于另一个小的配置问题引出来的, 这里一并记录下
我们的配置有个报错, "enable hash balancing method support parameter backup", upstream中有backup配置也需要新增hash method, 触发了这个问题
参考文档https://forum.nginx.org/read.php?29,281365,281369#msg-281369
<p>Generally, hash methods don't support the "backup" parameter,
but for those who need backup when falling back to round robin,
there's a work around: put the "hash" directive after the
"server" directives in the "upstream" block.</p>
因此需要把hash 挪到后边, 这就刚好跟keepalive指令有了前后的冲突</code></pre>
从1.12版本测试结果看, hash 和backup一起用, 会导致backup无法起作用, 需要特别留意, 而1.25系列则正常, 估计是做了修复

nginx1.25.0支持HTTP3和QUIC

nginx1.25.0 mainline已经支持了HTTP3和QUIC了

需要 编译工具 gcc g++ cmake go

yum install -y g++ gcc cmake go git

git clone https://boringssl.googlesource.com/boringssl

#这是nginx的旧方式, 也可以

cd boringssl && mkdir build && cd build && cmake .. && make && cd ../../

#新方式, 有点bug

#cd boringssl && mkdir build && cmake -B build && make -C build && cd ../

编译最新版boringssl go的版本>1.18.9, 我的1.16版本出错了升级后正常, CMake 3.10 or higher is required

这里开始编译nginx, 注意跟quic.nginx.org的测试版有不同, 没有了quic_stream模块

cd nginx-1.25.0
./configure
    --with-debug
    --with-http_v3_module
    --with-cc-opt="-I../boringssl/include"
    --with-ld-opt="-L../boringssl/build/ssl
                   -L../boringssl/build/crypto"
make && make install 

配置, 这里跟quic.nginx.org的测试版有不同, 没有了http3 取而代之的是listen 443 quic

http {
    log_format quic '$remote_addr - $remote_user [$time_local] '
                    '"$request" $status $body_bytes_sent '
                    '"$http_referer" "$http_user_agent" "$http3"';

    access_log logs/access.log quic;

    server {
        # for better compatibility it's recommended
        # to use the same port for quic and https
        listen 443 quic reuseport;
        listen 443 ssl http2 reuseport backlog=8192;;

        ssl_certificate     certs/example.com.crt;
        ssl_certificate_key certs/example.com.key;

        location / {
            # required for browsers to direct them to quic port
            add_header Alt-Svc 'h3=":443"; ma=86400';
        }
    }
}

这里解释下配置:

listen 443 quic reuseport; #配置H3协议守护, 注意reuseport 放在默认虚机即可

add_header Alt-Svc ‘h3=”:443″; ‘; #这个是告知客户端支持H3, 需要这个才会访问到H3

参考文档:

https://nginx.org/en/docs/quic.html

https://boringssl.googlesource.com/boringssl/+/HEAD/BUILDING.md

nginx range回源 和 range slice回源

range request in nginx reverse proxy

nginx proxy_cache 模式下是否支持range, 取决于源站是否返回了: Accept-Range Header 

在源站没有明确支持range的请求下, 即便nginx cache 了整个文件, 也不会响应任何range 请求, 会返回整个文件

这个行为方式可以通过 修改proxy_force_range on;来修改

Syntax:proxy_force_ranges on | off;
Default:proxy_force_ranges off;
Context:httpserverlocation

This directive appeared in version 1.7.7.

Enables byte-range support for both cached and uncached responses from the proxied server regardless of the “Accept-Ranges” field in these responses.

nginx 有个特殊的模块叫做http_slice_module, 可以支持分片回源

比如如下配置, 会以1M为文件块跟源站回源, 并存成多份1M分割的cache

slice              1m;

    proxy_cache_key    $host$uri$slice_range;

    proxy_set_header   Range $slice_range;

    proxy_http_version 1.1;

    proxy_cache_valid 200  206 300m;

从测试看, 即便开启了proxy_force_range on和slice range 回源, 在源站没有明确返回Accept-Range的情况下, nginx 依然不会使用slice range回源, 保持了良好的适配性

http://nginx.org/en/docs/http/ngx_http_proxy_module.html#proxy_force_ranges

https://forum.nginx.org/read.php?2,281946,281946#msg-281946

proxy_pass 建议写法

            location /v {
                proxy_pass https://gs.x.sohu.com;
            }
看个简单的例子, 一般为了方便我们会直接把域名写在proxy_pass的后边, 这会导致当这个域名无法解析的时候,比如机房下线了,比如第三方回源的域名被摘掉了, 导致nginx restart失败
建议的写法是:
                location /v {
                     set $new_host "gs.x.sohu.com";
                     proxy_pass https://$new_host;
                }
两者的不同之处在于: 
1. proxy_pass直接跟域名的话, 会且只会在nginx 服务起来的时候解析一次, 失败则起不来
2. proxy_pass跟一个域名变量的话, 是调用resolver的, 跟随resolver的配置, 包括有效时间等, 有请求的时候才解析, 失败了也不影响全局服务

HTTP2 URL请求过长访问失败的问题

使用过长的url通过H2访问的时候, 容易出现请求被reset掉, 但是HTTP/1.1请求没事

  • TLSv1.2 (IN), TLS alert, close notify (256):
  • Empty reply from server
  • Connection #0 to host api.k.sohu.com left intact
    curl: (52) Empty reply from server
  • Closing connection 0

打开nginx debug 日志可以看到

client sent too large header field while processing HTTP/2 connection

这是因为HTTP2有一套自己的优化参数, 主要跟两个参数有关:

http2_max_header_sizehttp2_max_field_size

http2_max_field_size 是HPACK压缩的header大小(H2的特性, 头部压缩), 默认值4k

http2_max_header_size HPACK解压后的header大小,默认16k

需要特别留意的是, 1.19.7版本以后统一使用large_client_header_buffers 来控制

这几个参数都可以根据单独server 来使用的

http://nginx.org/en/docs/http/ngx_http_v2_module.html#http2_max_field_size

参考文档:

https://phabricator.wikimedia.org/T209590

nginx upstream check module TCP check检测漏洞

upstream test_check_bin {
server 10.19.127.22:8080;
server 10.19.127.57:8080;
server 10.19.126.6:8080;

keepalive 32;
check interval=10000 rise=2 fall=3 timeout=3000 default_down=false;

}

我们使用的是一个臭名昭著的模块 , 这个模块的作者去了淘宝后便只有tengine里边的模块得到更新了

https://github.com/yaoweibin/nginx_upstream_check_module

目前发现了在当前代码存在两个问题:

  1. TCP检查在几种情况下会失效, 比如交换机挂掉, upstream机器网线被拔了, upstream机器crash了
  2. TCP检查的rise count 存在不增加的情况, 主要是裸JAVA和JAVA容器(java -Dspring.profiles.active=local -jar httpbin-gateway-test.jar),裸python -m SimpleHTTPServer 80之类

第一个问题是因为这个版本的upstream check TCP代码使用的keepalive模式, 根据这个文章的解释TCP Keepalive的心跳包是7200s,两个小时,一旦建立,没有收到主动关闭请求的话在探测端会一直保留establish的状态

https://m.haicoder.net/note/tcpip-interview/tcpip-interview-tcp-keepalive.html

当upstream端突然硬件故障/交换机挂掉/网卡被拔之类的极端情况出现的 时候, nginx 基于keepalivedTCP检测是没办法捕获到这个情况的(检测模块没收到RST/或者dst unr包)

在正常情况下, 比如upstream 端web服务器 STOP了, web服务器oom被系统kill了, docker 实例被stop/kill了, 都会触发关闭连接的请求包 给到nginx 端, 能识别到服务down了

这个是upstream端被kill了
docker kill/stop 都会发包告知nginx TCP监测端

从tengine这个模块的最新代码看, 作者也意识到了这个问题, TCP检测把need_keepalive参数从1改成了0

这个1表示need_keepalive, tengine修改为0了
ngx_check_conf_t 模块这个结构体的定义

这个参数变成0之后会影响clean_event的操作, 每次检测完毕后会close掉连接,每个检测周期都会重新发起TCP连接

need_keepalive参数控制了连接是否销毁的行为

第二个问题: rise counts 不增加, 这个通常都是upstream 端listen 模式有问题导致, 它并没有正确的定期回包, 通常情况下, nginx, apache都能正常的主动回包让rise counts增加

大多数upstream端主动发送包(确认是否存活), 否则很快就会close

python java这些裸起的一些简单服务就没有定期主动回包, 而在这个版本的代码中, 会判断这个connection是否存在, 如果存在则return了导致计数器不会增加

tengine的新代码是去掉了connection != NULL的判断条件

不过, 划重点: 无论是否回包, rise counts 是否增加,并不影响TCP监测的存活性, TCP监测keepalive模式仅仅以能否建立连接(刚启动时)/是否收到upstream的异常包为判断依据

总结: 为了避免过于复杂的处理逻辑, tengine去掉了keepalive的TCP探测,每次请求完都销毁连接,下次探测再重新协商请求

这里给下针对这个问题的patch:

https://www.4os.org/patch/nginx_upstream_check_tcp.patch

客户端证书认证

双向认证, 就是客户端和服务端均需要证书认证身份的一种双向认证形式

这里主要介绍下客户端证书的配置

openssl genrsa -out root.key 1024

openssl req -new -out root.csr -key root.key

openssl x509 -req -in root.csr -out root.crt -signkey root.key -CAcreateserial -days 3650

openssl genrsa -out client.key 1024

openssl req -new -out client.csr -key client.key

openssl x509 -req -in client.csr -out client.crt -signkey client.key -CA root.crt -CAkey root.key -CAcreateserial -days 3650

nginx配置

ssl_client_certificate ssl/client.crt;
ssl_verify_client on;

这个是给客户端导入的p12格式证书

openssl pkcs12 -export -clcerts -in client.crt -inkey client.key -out client.p12

nginx 升级后访问400 BAD REQUEST增多的问题

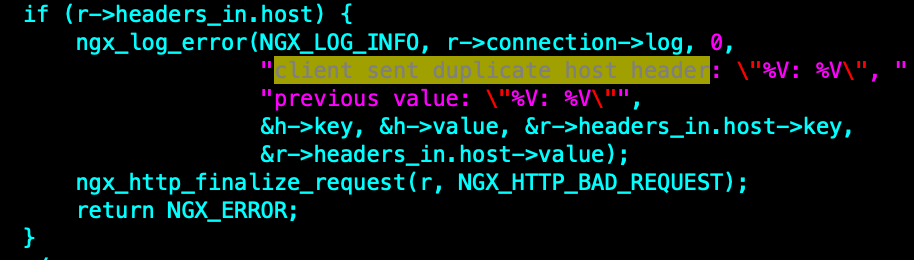
一些旧设备访问nginx的时候可能会出现400 bad request, 这个跟2020.2月nginx移除了一个兼容特性有关

Disabled duplicate “Host” headers (ticket #1724). Duplicate “Host” headers were allowed in nginx 0.7.0 (revision b9de93d804ea) as a workaround for some broken Motorola phones which used to generate requests with two “Host” headers[1]. It is believed that this workaround is no longer relevant.

新增的这块代码如下: 会判断是否有重复的host 头, 而在之前的版本是认为可以容忍的

这个兼容特性被移除后, 会导致一些旧版本的移动设备响应异常

而我们线上测试机器主要是兼容了spdy协议, 也出现了400 BAD REQUEST, 这个跟spdy代码里边本身进行了一遍header处理有关:

可以参考:

https://hg.nginx.org/nginx/rev/4f18393a1d51

http://mailman.nginx.org/pipermail/nginx-devel/2020-February/012999.html

chromium指定tags 版本下载

线上有个业务需要使用到指定版本的chromium源代码, 这里记录下

一、安装 depot_tools 项目构建工具

  1. 克隆 depot_tools git仓库
$ git clone https://chromium.googlesource.com/chromium/tools/depot_tools.git

  1. 添加环境变量
$ export PATH="$PATH:/path/to/depot_tools"

Tip: /path/to/depot_tools, 为你 depot_tools 本地的路径

二、使用 depot_tools 下载源码

  1. 创建一个用于存在 chromium 的目录 (您可以任意命令,并存放在任何您喜欢的位置,只要是路径路径并且没有空格即可)
$ mkdir chromium && cd chromium

  1. 使用 depot_tools 的 fetch 命令,来检查代码及其依赖关系。
$ fetch  chromium
//Don't use fetch --no-history chromium, 我们需要切换到历史版本

Tip: –no-history: 代表不需要历史记录, 完整仓库大约40G 源码大小大概 8G 左右,下载时间因网速而议,请耐心等待

三、切换到指定的tags

# Make sure you are in 'src'.
# This part should only need to be done once, but it won't hurt to repeat it. The first
# time checking out branches and tags might take a while because it fetches an extra
# 1/2 GB or so of branch commits. 
gclient sync --with_branch_heads --with_tags

# You may have to explicitly 'git fetch origin' to pull branch-heads/
git fetch

# Checkout the branch 'src' tree.
git checkout -b branch_$BRANCH tags/$BRANCH

# Checkout all the submodules at their branch DEPS revisions.
gclient sync --with_branch_heads --with_tags

到这一步做完就可以校验下了

$cat chrome/VERSION

参考文档:

https://www.chromium.org/developers/how-tos/get-the-code/working-with-release-branches

https://github.com/aidevjoe/ChromiumBuild

nginx 生成coredump的办法

网上很多说nginx生成coredump的办法在RHEL7 RHEL8都无法正确的生成core 文件, 这里给一下正确的步骤

#新建一个文件夹, 并确认nginx可以读写
$ mkdir /opt/itc/fssnginx/logs/cores/
$ sudo chown root:root /opt/itc/fssnginx/logs/cores/
$ sudo chmod 1777 /opt/itc/fssnginx/logs/cores/

#设置unlimited core file dump
$ ulimit -c unlimited
#也可以在系统中彻底修改
$vim /etc/security/limits.conf
* soft core unlimited

#设置系统级别的core file
$ echo "/opt/itc/fssnginx/logs/cores/core.%e.%p" | sudo tee /proc/sys/kernel/core_pattern

#允许suid dumpable
$ sudo sysctl -w fs.suid_dumpable=2

$ sysctl -p


#重启nginx
systemctl restart nginx
#编译nginx.conf,然后重启nginx 服务
working_directory  /opt/itc/fssnginx/logs/cores/;
worker_rlimit_core 500M;

测试,找到nginx workprocess的进程号,发送 SIGSEGV  给该work process进程

$ps aux|grep nginx
$kill -11 `$work_process_pid`
#检查core 文件
$ll /opt/itc/fssnginx/logs/cores/
-rw-------. 1 nobody nobody 65753088 Jun 22 17:54 core.nginx.5662
-rw-------. 1 nobody nobody 70475776 Jun 22 18:03 core.nginx.5702

释疑: 看起来跟内核变量有关

#旧版本RHEL6是这个设置:

kernel.core_pattern = core

#新版本OS 是这个: 会被通过管道发给这个可执行命令

kernel.core_pattern = |/usr/lib/systemd/systemd-coredump %P %u %g %s %t %c %h %e

参考文档:

https://docs.nginx.com/nginx/admin-guide/monitoring/debugging/